NOTE: It is not possible to reach Level 10 of anything without a Divine Inspiration
Overview[]
Wall Defenses are used to Defend your City from incoming attacks. Building up your Wall Defenses is a good way to defend your city, boost your Power and intimidate other players in the game.
These Defenses are not Troops, but they do have their own Might Values. Unlike Troops these Defenses cannot be set to 'Hide' or 'Defend;' they are always 'active' and they have no upkeep cost.
Similar to troops in your Barracks, Wall Defenses are divided into 3 different types:
- Ground (Caltrops, Spiked Barrier, Persian Sulphur)
- Artillery (Traps, Boiling Oil, Greek Fire)
- Horse (Wall-mounted Crossbows, Defensive Trebuchet, Hellfire Thrower)
The same modifiers apply in combat:
Artillery Defenses have bonus against Ground Troops;
Ground Defenses have bonus against Cavalry Troops;
Cavalry Defenses have bonus against Artillery Troops;
Tier 1[]
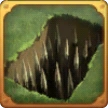
Traps[]
Traps are buried around the Walls, ready to swallow up attacking ground troops.
| Attack | |
|---|---|
| Life | |
| Might | 18 |
| Weak versus | Horse |
| Strong versus | Ground |
| Level | 7 |
|---|---|
| Blacksmith | 1 |
| Wall | 1 |
| Poisoned Edge | 1 |
| Food | 150 |
| Wood | 200 |
| Stone | 100 |
| Ore | 50 |
| Population | 2 |
Caltrops[]

Scattered in front of your Walls, Caltrops injure enemy horses.
| Attack | |
|---|---|
| Life | |
| Might | 18 |
| Weak versus | Artillery |
| Strong versus | Horse |
| Level | 7 |
|---|---|
| Stable | 1 |
| Wall | 3 |
| Alloy Horseshoes | 1 |
| Food | 150 |
| Wood | 100 |
| Stone | 50 |
| Ore | 200 |
| Population | 2 |
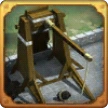
Wall-Mounted Crossbows[]
Wall-Mounted Crossbows damage enemy siege weapons.
| Attack | |
|---|---|
| Life | |
| Might | 18 |
| Weak versus | Ground |
| Strong versus | Artillery |
| Level | 8 |
|---|---|
| Workshop | 1 |
| Wall | 2 |
| Fletching | 1 |
| Food | 150 |
| Wood | 50 |
| Stone | 200 |
| Ore | 100 |
| Population | 2 |
Tier 2[]
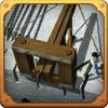
Defensive Trebuchet[]
Defensive Trebuchets hurl huge rocks, destroying enemy siege weapons.
| Attack | |
|---|---|
| Life | |
| Might | 24 |
| Weak versus | Ground |
| Strong versus | Artillery |
| Level | 6 |
|---|---|
| Workshop | 3 |
| Wall | 5 |
| Fletching | 4 |
| Food | 300 |
| Wood | 100 |
| Stone | 400 |
| Ore | 200 |
| Population | 4 |
Boiling Oil[]
Flash frying foils furious foes!
| Attack | |
|---|---|
| Life | |
| Might | 24 |
| Weak versus | Horse |
| Strong versus | Ground |
| Level | 9 |
|---|---|
| Workshop | 3 |
| Wall | 4 |
| Fletching | 4 |
| Food | 300 |
| Wood | 400 |
| Stone | 200 |
| Ore | 100 |
| Population | 4 |
Spiked Barriers[]
A hedge of sharpened spikes will break any cavalry charge!
| Attack | |
|---|---|
| Life | |
| Might | 24 |
| Weak versus | Artillery |
| Strong versus | Horse |
| Level | 11 |
|---|---|
| Blacksmith | 3 |
| Wall | 6 |
| Poisoned Edge | 4 |
| Food | 300 |
| Wood | 200 |
| Stone | 100 |
| Ore | 400 |
| Population | 4 |
A Rough Guide[]
This is a work in progress. Please feel free to leave any comments on anything you think is wrong or any information that may be missing.
Introduction[]
Wall Defenses are probably the most controversial aspect of the battle mechanic. Part of this stems from a lack of understanding of how they work but also from their inflated might value. People expect them to work more effectively than they do because the might value is so high. As with all aspects of the battle mechanic the might value must be ignored when determining Wall Defense effectiveness. There is still much that is unknown about how Wall Defences work and many assumptions have been made based on observed behavior in battle. One thing that is certain however is that Wall Defenses are much more effective when the defender has a Knight set to Marshal and has 'Hide all troops' set to OFF. Wall Defenses definitely do not gain any bonus from Knight, Research, or Items if 'Hide all troops' is set to ON. However they seem to gain some, if not all, of the bonuses if the defender has a Knight set to Marshal and has 'Hide all troops' set to OFF.
How They Work[]
A common complaint is that Wall Defenses are useless if you do not have a Knight set to Marshal and have 'Hide all troops' set to OFF. If you think about it there is a certain logical sense to this behaviour. Imagine a castle that either has no army or that army is hiding and not defending the castle. Any Wall Defenses can then be easily destroyed by an attacker. They do not need to worry about the defenders rushing out to attack and can take their time carefully removing Wall Defenses. Take the same castle and provide it with an army that is willing to fight and the attacker has a much tougher time of it. Now they have to worry about the defenders and the Wall Defenses. They can no longer take their time removing Wall Defenses and have to blindly rush the castle. This results in much higher losses for the attacker. It is an overly simple analogy but hopefully an effective one.
Should I Build[]
Whether or not you build Wall Defenses is a matter of play style. One thing that is certain though is that Wall Defenses are second priority to troops. If resources are an issue and you have to choose between building Wall Defenses and training troops then you should always train troops. Wall Defenses serve two purposes. Firstly they provide an extra barrier between the attacker and something you want to protect (most likely your resources). Secondly they provide a method to reduce the attackers offensive strength without impacting on your own defensive strength. So if you have something to protect or you want to whittle away at enemy troops then Wall Defenses are for you.
When to Build[]
Wall Defenses are only useful when you have a Knight set to Marshal and you have 'Hide all troops' set to OFF. Even then they are still weaker than their might implies. To give them an even bigger boost you also need a sizable army to help defend. To that end you should not even begin building Wall Defenses until you have enough troops to comfortably defend yourself with. Only then should you set 'Hide all troops' to OFF and begin building Wall Defenses.
Setting 'Hide all troops' to OFF is risky. Doing so has the potential consequence that you can lose everything. Never do so unless you are confident that you have enough troops to discourage other players from attacking you. This amount is dependent on your world, how big the players are and how aggressive they are. Talk to experienced players on your world before deciding how many troops are needed to defend with.
You don't have to rely on just your own strength when you decide to start building Wall Defenses. You can get your alliance members to reinforce you whilst you are trying to build up your Wall Defenses. That way you are a much more intimidating target and are less likely to get attacked. Make sure you have a high level Knight set to Marshal and 'Hide all troops' is set to OFF. The reinforcing troops rely on both of those to receive their attack and life bonuses.
What to Build[]
WALL DEFENCES - HOW TO DESTROY AN UNDEFENDED WALL To minimise losses when attacking an undefended wall, meaning the target is hiding troops, you need to send troop types that are strong against the wall defenses. Tier 1 troops are ideal for destroying walls. They are considerably stronger than their might implies and they are quick to train. By using Tier 1 troops to destroy wall defences you are minimising the amount of might you lose during the attack. One way to determine what to send is to use the following formula:
Troop Qty = Wall Defence Qty / (1 + (Knight / 200) + (Research / 20) + Item)
Notes: Wall Defence Qty - Substitute the quantity of each wall defence type except for Defensive Trebuchet where you should double the quantity. Knight - Substitute Knight with the level of your Knight sent on the attack. Research - Add together your Poison Edge and Healing Potion levels and divide by two. Substitute Research with that value. Item - If using both attack and life buffs then substitute 0.2 for Item. If using either attack or life buffs, but not both, then substitute 0.1 for Item. If not using buffs then substitute 0 for Item.
For example: Defender has a full level 9 wall with 34,133 Traps, 34,133 Caltrops, 34,133 Wall-Mounted Crossbows, and 51,200 Defensive Trebuchet. Attacker is using a level 200 Knight, has maxed research, and is using item buffs. Using the formula above you would get the following:
Traps = 34,144 / (1 + (200 / 200) + (10 / 20) + 0.2) = 13,653.2 Light Cavalry Caltrops = 34,144 / (1 + (200 / 200) + (10 / 20) + 0.2) = 13,653.2 Archers Wall-Mounted Crossbows = 34,144 / (1 + (200 / 200) + (10 / 20) + 0.2) = 13,653.2 Militiamen Defensive Trebuchet = 102,400 / (1 + (200 / 200) + (10 / 20) + 0.2) = 40,960 Militiamen
Minimum troops sent based on the above formulas would be:
Light Cavalry = 14,000 Archers = 14,000 Militiamen = 55,000
If your Rally Point allows you to send more troops then add the strongest Tier troops you have. Unless the target suddenly defends you will not lose any Tier 2 or Tier 3 troops. The Tier 1 troops will take all the damage whilst the Tier 2 and Tier 3 troops reign damage upon the defender. It would be expected that approximately 10% to 20% of the Tier 1 troops and all Tier 2 or Tier 3 troops would survive.
An In-Depth Analysis[]
This is a work in progress. Please feel free to leave any comments on anything you think is wrong or any information that may be missing.